I am a member of the Collective Bias® Social Fabric® Community. This shop has been compensated as part of a social shopper amplification for Collective Bias and its advertiser. #BeautyInspiration #CollectiveBias
Being home with my little sisters is always a fun excuse to play with make up. This weekend I took Nicole to Walmart to pick up a few products she needed and grabbed everything to teach both of my sisters how do to basic contouring and highlighting (not that at fifteen and seventeen they need to be wearing almost any make up – but its still fun :). We created a step by step animated tutorial to let you in on the fun.
Disclaimer: I’m not a make up artist by any means, but I’ve been wearing make up for almost ten years and after a few ‘classes’ with this gorgeous girl this year I’ve learned a lot! Most of my foundation tips in today’s post I’m just passing on from her and from experience.
Step 1: Prime
Start with a clean face and use a primer, like the Stay Matte Primer from Rimmel I’m using here. Apply a small amount all over your face. This will help even out your skin and act as a base for the rest of your make up.
Step 2: Foundation
Using a beauty blender, apply an even amount of Stay Matte foundation all over your face. Make sure you blend well into your hair line and jaw line. I also applied a little Wake Me Up concealer by Rimmel for extra coverage where I needed it.
**the combination of the primer and Stay Matte foundation keeps my shine under control all day (and I love that)
Step 3: Contour
Using an angled brush (or by pinching a round brush like I am in the pictures), apply a line of bronzer in the hollow of your cheeks. Add a little bronzer to the sides of your nose as well as your hairline. I used Sunshimmer Maxi Bronzer and a small round brush.
Apply a line of blush on your cheekbones, like this one I used, just above the line of bronzer. Blend well, using small circular motions.
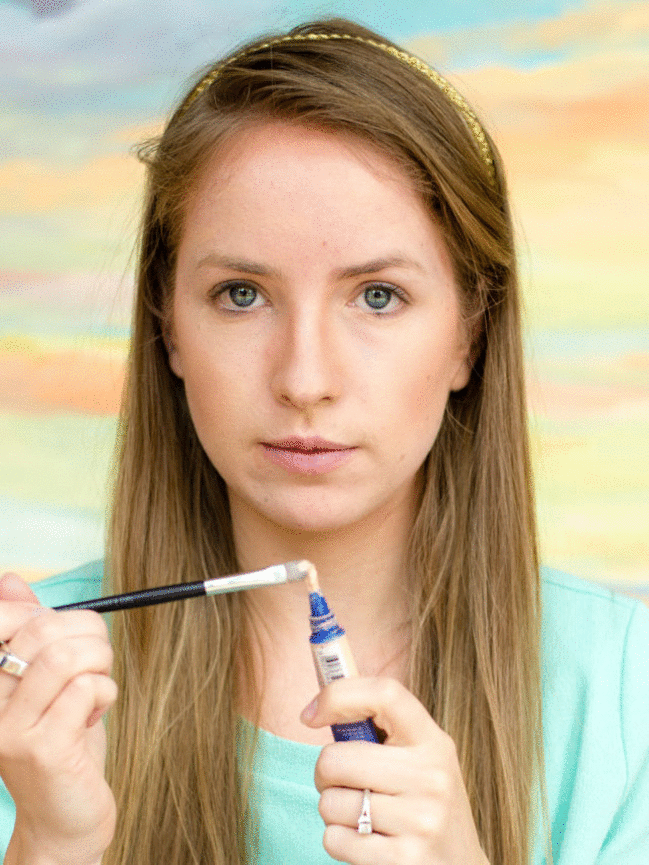
Step 4: Highlight
Using a concealer a little lighter than your skin (I used Match Perfection by Rimmel), apply a little on your nose (see picture), above your upper lip and just below your lower lip. Also add above the blush line and below your eye (be sure to blend it in). I used a white eye shadow (without any shimmer) to set the concealer. By applying a little white powder to the places I had highlighted, it really helps the white last.
Step 5: Eyes
For this basic look I only used mascara (Scandaleyes Retro Glam) and applied to upper and lower lashes. I applied a little white powder on the inside corner of my eyes to help them look open but skipped any other shadows. The Mascara does enough on its own that I don’t feel like I need eyeliner at all.
Step 6: Lips
I used Lasting FInish Color Rush liner and stain from Rimmel for a neutral lip. Begin by gently lining your lips to prevent the color from bleeding and helping it look more defined. Then fill it in with the stain.
**I really love how moisturizing this lip stain is – definitely the most moisturizing of the ones I’ve tried this spring.
And that’s it!
Here’s the whole look with Rimmel from start to finish – you can really see the difference five minutes of make up makes.
WOW! This tutorial with the GIF steps makes it so easy to follow along. I cant wait to get to Walmart and get these Rimmel products so I can get this look. #client


Yay, a giveaway 🙂
I would like to create an easy everyday look with beautiful skin, please ^^
love this tutorial!! so great
xo Jessica
http://www.NewlyLoved.com
Love those Gif's!! that's a pretty neat way to show your highlighting and contouring skills!
http://www.cindyslittleblackbook.com
I'd love to experiment with a different kind of day look than I've been using for the last few years
I want to know where you got that T-shirt, super cute!
I participated in the gif tutorial too! So much fun! 😀
Wow, when you do it, it looks so easy, I must try contouring myseflf 🙂
Thanks for the tutorial and giveaway, xoxo, Milena
I absolutely love this! I am so terribly awful at make up and it's nice to see a simple tutorial that I can try! You make it look so easy, I love it!
Chloe
http://www.thewordthief.com
Great tips, I'll be sure to try them! Hope I win the giveaway 🙂
I would love to have a fresh clean natural look
WOW! This tutorial with the GIF steps makes it so easy to follow along. I cant wait to get to Walmart and get these Rimmel products so I can get this look. #client
What an awesome tutorial! Love the gifs!! I've actually never tried contouring but I'll give it a go.
♡ Regina ♡
Margarita Bloom: Beauty & Skincare
Blog♡ http://margaritabloom-glamourville.blogspot.com
Facebook♡ https://www.facebook.com/pages/Margarita-Bloom/28087812273?ref=mf
Twitter♡ https://twitter.com/MargaritaBloom
i have yet to try Rimmel- thanks for the tutorial!
-Edie